wanna buy me a camera?
no camera
no pictures.
lol
or
give colin a lashing for not posting the damn pics online
ARGH
i bought turkey sausage from the farmer's market today
totally excited to eat it for lunch.
then i dropped it
so i went back to find it
AND THEN
right before i back tracked the whole way i saw a woman with a bag of turkey sausage. i thought. oh. thats weird.. to go to the farmers market only to buy turkey sausage.
i'm pretty sure she took MY FKNG TURKEY SAUSAGE.
because i back tracked
and it wasnt there.
WHO TAKES FOOD FROM THE GROUND
WTF?
DONT YOU THINK SOMEONE WOULD COME BACK FOR IT!
ARRRGGGHHH
Saturday, October 17, 2009
Thursday, October 15, 2009
nothing like a giant bowl of pesto pasta and ina garten to make me feel better
i've been having a pretty bad week. just not really on top of my game.. so today i decided that i HAVE to change this!
i did NOT im today at work ahhaha i know its pathetic that i do it but. how can you resist the temptation??
anyways. after working super hard today (i hope my bosses noticed) i got off at a different stop on the subway, went to fancy pansy 'provisions' to buy basil (incase my trusty associated was closed when i got home) and bought a thing of overpriced basil and overpriced parm. lol well it was fine. i got a free piece of yummy gourmet pork sausage out of it. (nothing like freebies to justify the overpriced food)
ok pesto!
price (about 12 bucks if your retarded and you shopped at the silly expensive gourmet store)
1 cup of basil (i used my whole bundle.. cut up to about 3/4 cup)
1/2 pine nuts
1+ tablespoon parmesan cheese (i had the crumbly kind..)
ok. since i dont have a food processor, i did this by hand. When Alvin was here and we made gnocchi (which he has yet to blog about because he fails). I do actually like hand chopped pesto.. and if youre not making alot of it.. its not that bad. its mainly cos the pinenuts are really chunky if you do it by hand.. and it realy gives the pest a good texture.
so.
- chop basil. I did this gradually. because if you try and chop all of it at once, it'll be messy
- add pine nuts. again, add this gradually, or you'll have rolling pine nuts
- add cheese! (if your a cheese lover, dont get tempted to add too much! You can always add more when you eat it!)
last time, we coudlnt find our parm, so we added gruyere. it actually tasted pretty good but the problem was the gruyere would melt when it got to the pasta and it was just messy. and then the pesto woudlnt mix and would just end up in lumps! (sigh)
anyways. hand chopped pesto is yum :D
i'm also cooking the base for some vichyssoise. I had left over leek from my ham and leek quiche and decided to make the most of the potatoes and leeks in the fridge :D
for vichyssoise you need:
- two big leeks
- two big russet potatoes
-1 cup of sour cream/heavy cream/ or 1/2 cup of sour cream and 1/2 whole milk
- salt and pepper to taste
- chop, soak and drain leeks (most ppl recommend only using the white and light green part.. but i always feel bad about wasting food, plus green bits are always the healthiest! if youre like me, cut off spotty/wilting/too tough green parts and then chop. Put leeks in a large bowl and soak in lukewarm water and swish around so the dirt comes out.. why are leeks always so dirty?!)
- heat up pot, add a splash of oil and caramelize leeks
- add potatoes
- add approx 4 to 5 cups of water
- bring to boil and simmer until potatoes are soft.
- turn off heat and blend with hand blender
- add dairy and stir. the dairy all depends on how creamy you like it. My boyfriend really likes the tangy taste of sour cream. so we use sour cream and a splash of whole milk or heavy cream if we have it
- add salt and ground pepper to taste :D
WHY IS NYC SO COLD! SOMEONE SAVE ME.
Sunday, October 11, 2009
alvin fails at blogging. i have insane ocd
lol.
i'm not sure if i have an irrational fear of ecoli. but since theres been news reports every other week about spinach and other such salad veggies spreading ecoli.. well. who isnt afraid?
lol today Colin and I are going to Lindy's for dinner, and i rmbed she lovesss kale salad. I had this genius kale and pumpkin salad at Marlow's and sons last year and thought it would be a really delicious salad to bring!
oh yea. back to e coli. I'm also afraid of naked food. that is..food that is just.. out in the open for anyone to just touch. why is kale always naked? dont they know people eat kale raw? not thinking, i put the kale in the basket.. the whole time thinking.. ew ew.. but not thinking.. oh maybe i should put it in a bag? fast forward i get to the cashier.. and.. facing the prospect of putting my raw kale onto the belt that has meat and all kinds of gross shit put on it all the time.. well. i put my shit down and ran back to fine bags.. came back.. realised one bag wasnt big enough to put two things of kale into the bag.. ran back... got another bag.. then. well... lets just say.. when i looked up.. the cashier and the bag man.. were laughing at me. :(
oh and it doesnt get any better, because i ended up breaking off the tip of my butcher knife.. those cuisinart f***ers
googling led me to April Bloomfield's grilled pumpkin and kale salad. (you can watch her make it here: http://www.eatdrinkordie.com/videos/fa0dea0da8/pumpkin-salad-april-bloomfield-from-april-bloomfield )
Sounds pretty good too since nyc has been a bit chilly and grilled pumpkin sounds really warm and hearty :D Well, I dont have all her ingredients since a) Associated does not sell pumpkin oil b) Associated does not sell curly kale (just normal kale) and c) Associated does not sell pecorino.
So heres my take
Grilled pumpkin and kale salad
ingredients:
1 bundle of kale
1 medium size kabocha pumkin
some parmesan cheese
lemon
olive oil
balsamic vinegar
- wash pumpkin, cut in half and scoop out seeds. cut pumpkin in to medium size pieces (or as April calls it 'rustic sizes) toss in olive oil, salt and pepper and put onto foiled baking sheet. Put into oven at 375 degree. bake until soft (about 20 mins).
- separate seeds from the fleshy meat the seeds are covered in. (i always try to clean them pretty thoroughly or else the fleshy bits burn and its a pain) Toss in olive oil place onto small baking sheet, sprinkle little salt ontop, place into oven/toaster oven at 250 - 300 degrees. bake until crunchy. Make sure to take out every 10 minutes or so to stir the seeds around so they dont stick to the foil/pan.
- remove stems, wash, cut and dry kale.
-When pumpkin is ready, remove from oven and squeeze half a lemon (approx 1 tablespoon) over pumpkin and toss.
-Af
Plating
since i'm bringing this to someone else's house, instead of plating immediately, i'm going to let the pumpkin cool down first (and nibble at the pumpkin bits a little) so the kale doesnt completely wilt by the time it gets there
- layer the kale and the pumpkin. Put a layer of kale, add a splash of lemon, and put down a layer of pumpkin. Repeat until necessary. Save some extra pumpkin on the side to add to the top for color. drizzle with olive oil (or if you have pumpkin oil use that). Add balsamic vinegar if necessary.
I havent put the salad together yet. I'm waiting to add add it together at the last minute.. i dont really want the kale to wilt too much. plus the pumpkin's still hot. (but really delicious on its own) ahhahah :D
i'll take pics later :D
Tuesday, September 1, 2009
a sponge cake for saena? maybe...
Herro!

 so saena and i have been discussing what could have gone wrong with saena's cake? We found a similar recipe to hers and i decided to give it a go. Anyone who went to college with me would know that Erti/Helen/Saena and I spent lots of our 'relax' time (we didnt have a lot of that) sitting in front of the tv watching chick flicks and eating sponge cake. Unfortunately i've lost the original recipe and its been a year and a half since i've made sponge cake. SO! this was the result. just for Saena i did the cute pic of the cake as the owl's tummy ahhaha.
i also made two videos for saena but eh.. the first one is really stupid so i'll save that for her and colin and anyone whos interested in watching me talk about fred and ginger whilst beating egg yolks with sugar. HAHHA
ok so heres my recipe
ingredients:
3 eggs
3 tbsp water
3/4 cup of sugar
1 tbsp honey
1 tsp vanilla extract
1 cup all purpose flour
1/2 tsp ground green tea
1 tsp baking soda
1 pinch of salt
- beat eggs, sugar, honey, vanilla extract, water together until pale yellow and foamy. (do not overbeat! if eggs start seperating you know its no good lol)
- fold in dry ingredients, as nigella says 'slowly but firmly' and dont over fold!
- pour batter into lightly greased pan.
- steam in rice cooker (for 20 mins in starting from when water is boiling) or on a rack in a wok/pan for 20 mins on medium heat. If steaming in a pan/wok, cover pot opening with a paper towl or clean hand towel (this absorbs the moisture and avoids it dripping into the cake).
as i suspected while i was making the batter, my cake is a little over folded. I suspect it started when i was beating the eggs, i think i might have over beaten it a little bit. I modified the recipe a lil bit from what i was doing in the video (like the baking soda and the sugar) but i will retest it soon to make sure the recipe is correct.
WELL SAENA! i hope this helps :D
Sunday, August 30, 2009
guest blog #2 fails: this is supposed to be...
this is supposed to be ma lai go
this is supposed to be a cookie

this is supposed to be a cookie

i made soy sauce chicken!
 ahhahah and it was delicious.
Unfortunately I used a blogger's recipe so i cant copy it onto our blog but i can link you.
http://www.christinesrecipes.com/2009/07/soy-sauce-chicken.html
the other unfortunate thing (esp for our fail king alvin) is its in chinese.. so i'll make a translation w/ personal updates of the recipe
Ingredients:
some chinese cooking wine (Blogger Christine uses 'siu hing', i didnt have any so i just used rice wine)
1/2 cup of light soy sauce
1/3 cup of dark soy sauce.
1 cup of water
1 piece of chinese rock sugar (i used a piece about the size of a.. golf ball.. probz smaller..i think its really up to you how much sugar you wanna put in.. how big the chicken.. how much soy sauce blah lbah
ginger (some for the chicken, some of the pan, some for the sauce)
spring onions/scallions (1 sprig for the chicken, a couple for the pan and 2 or 3 for scallion sauce)
couple cloves of garlic, smashed but not chopped
2 cloves of star anise Blogger Christine puts chinese dried citrus peel, but since i had none, i used 2 cloves of star anise, completely different aroma, but nice
warning! this recipe may be pretty easy to do, but it takes a little bit of time depending on the size of your chicken. Luckily for me its usualy just me and colin, so i got a small 2 lber from the farmer's market. Chinese people really like to use really fresh chicken for steaming, because frozen chicken loses its 'chicken' taste. I think your best bet other than going to china town to find live chickens (which is scary and i would never do) is to buy one from a farmer's market.
Prep: 10 mins
- rinse/clean chicken. You wont be needing any of the gizzards for this recipe if your chicken comes with it.
- wipe chicken dry with a paper towel
- put a few slices of ginger and a sprig of scallion into chicken cavity
- The blog says to 'wipe' the cooking wine onto the chicken... couldnt figure out/be bothered to find something to 'wipe' it with, so i just made sure the chicken was dry and the bowl was dry, then pour some wine over the chicken, and rolled the chicken around so the whole body was covered (dont soak that chicken though! AHHAH)
Prepping the pan: 10-15 mins
the blogger uses le creuset and swears by it.. well i'd love to have one too but too expensive! hhahah so i used a non stick pan. my chicken was small, so i used a 3" deep pan to cook it in.. any bigger and i'd probably HAVE to find a damn le creuset since my other pot is isnt nonstick lol.
-slice up some ginger, scallions and garlic for the pan.
- heat up pan with some oil. 'pop' pan with ginger, scallions and garlic. (chinese people call this 'bao hoong" - like.. exploding red ahahhaha - because your heating up the oil and flavoring the pan, almost all cantonese recipes call for this.)
- pour light+dark soy sauce, water, star anise into pan and bring to a boil, add rock sugar.
- when sugar has completely dissolved, turn heat down to low and add your chicken with the breast towards the pan. take a serving spoon and SERVE THAT CHICKEN SOME SAUCE. no i mean cover the chicken's body with soy sauce. be sure to put some soy sauce in the cavity too! cover the pan with lid and set your timer for 10 mins. now leave it alone.
- after then mins unlid, turn the chicken to its back side, now 'dress' the chicken again with sauce, then put the lid back on, set timer for 8 mins. leave
- unlid, turn chicken to side, dress, lid on for 13 mins, repeat for other side
- unlid, turn chicken back onto breast side, and bring soy sauce to a boil. While it is doing so, dress your chicken some more :D when sauce has come to a boil, turn heat off and quickly put the lid back on. depending on the size of your chicken, this last part will cook any bits that you've missed. My chicken was small, so i only did this for 5-10 mins and my chicken was well done. Make sure that when you cut into the chicken (ie the thigh) the juices that run are clear, not red.
scallion and ginger sauce:
- mix chopped scallions and fresh ground ginger together, add a little bit of salt for taste
- heat up some oil in a small sauce pan. when oil begins to smoke (a little) pour hot oil over scallion/ginger mix and voila. sauce. :D
Be sure to keep the soysauce left over from the chicken! :D i used it to cook some vegetables.. and i think i'll use it to make some stir fry udon today. that soy sauce is really delicious and totally reusable for another dish like fried rice etc. :D
oh doing posts first thing in the morning makes me HUNGRY :D ahahhaha
Thursday, August 27, 2009
i want a kitchen aid mixer!
http://www.williams-sonoma.com/shop/electrics/mixers-attachments/index.cfm?cm_type=lnav
omg.. i want a kitchenaid mixer. you know why? because they make an attachment for EVERYTHING EVER ie ICECREAM MAKER, PASTA, SAUSAGE MAKER, CITRUS JUICER! omg. lol seriously.. seriously.. well mainly i want the icecream maker attachment.... but a mixer would help me make bread/piecrust/batter! ahahhaha
well
i can have dreams. someday i will have that mixer. ahhaha
Tuesday, August 25, 2009
alvin fails. i made apple pie.. soup?
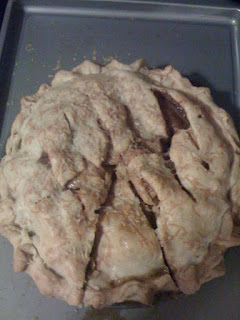
lol so colin and i decided we would make apple pie last night. well mainly it turned into me making apple pie and colin bought some greiere (sp?). anyways I think i kind of failed... because the filling turned really watery... it actually tastes really good and the crust is great but.. it just started pooling when i cut it! i think i will stick it in the oven again when i get home tonight. well. after doing some research we found out that maybe our pie is so soupy becuase i didnt put enough flour.. sofor those using the following recipe.. i advise more flour in the filling? or just maybe in the oven longer than 40-45 mins...
UPDATE:
oh i forgot to explain how i did it! hahhaha
ok
so i followed the instructions for the pie crust.. which is relatively easy.. but i used half real butter and half I CANT BELIEVE ITS NOT BUTTER!!! "FOR BAKING"hahha i love that.. anyways. pretty easy.. just broke the butter up with my fingers in the flour.. kind of like.. making apple crumble. then wrapped it up. since i didnt use shortening, i put the dough in the fridge to cool, i think i left it in there for a while because i didnt roll out the dough until after dinner.. which was.. maybe a couple of hours later.
then i cut all the apples into thin slices.. colin had found a recipe for 'all american' and told me to buy fuji apples.. which now that we look back on.. maybe we shoudlnt haev just cos everyone says to use granny smith + those are more tart and sour whereas fuji is more sweet. anyways.. mixed it all.. blah lbah.. i think this is the part that i messed up.. becuase i think there was excess water at the bottom.. and that might have contributed to the soupyness hahah
ok. so then. i rolled out the crust.. with a cup! rolling out pie dough with a cup is much easier than rolling out spring onion pancake dough.. probz cos its so much more buttery ahhaha :D
well the pie crust was delicious. and i'm going rebake it tonight to boil out more of the water.. i hope it'll be less soupy.. cos the taste is good. ahhahahha
OH i added greiere to the crust, an idea my old roommate and i got from pushing daisies and its relaly good because greiere is mild and it mkes the crust really crispy and delicious.
Happy pie day!
*sigh* i'm sad for my soupy apple pie.. but..
alvin fails for not blogging again. HAHHHAHHAHAHHA
*sigh* i'm sad for my soupy apple pie.. but..
alvin fails for not blogging again. HAHHHAHHAHAHHA
alvin fails. i made apple pie.. soup?
Ingredients:
2 cups all-purpose flour 3/4 teaspoon salt | 2/3 cup shortening 6 tablespoons cold water |

Directions: (continued)
| 1. | In a bowl, combine flour and salt; cut in shortening until crumbly. Gradually add water, tossing with a fork until dough forms a ball. Divide dough in half so one ball is slightly larger than the other. |
| 2. | Roll out the larger ball to fit a 9-in. or 10-in. pie plate. Transfer pastry to pie plate. Trim pastry with even with edge of plate. Pour desired filling into crust. |
| 3. | Roll out second ball; cut slits in pastry. Position over filling. Trim pastry to 1 in. beyond edge of pie plate. Fold top crust over bottom crust. Flute edges. Bake according to recipe directions. |
ingredients:
2 cups all-purpose flour 1 teaspoon salt 3/4 cup shortening 4 tablespoons cold water FILLING: 7 cups thinly sliced peeled baking apples 2 tablespoons lemon juice | 1 cup sugar 1/4 cup all-purpose flour 1 teaspoon ground cinnamon 1/4 teaspoon ground nutmeg 2 tablespoons butter or margarine 1 egg yolk 1 tablespoon water |
Directions:
| 1. | In a bowl, combine flour and salt; cut in shortening. Gradually add cold water, 1 tablespoon at a time, tossing lightly with a fork until dough forms a ball. Chill for 30 minutes. On a floured surface, roll half of dough into 10-in. circle. Place into a 9-in. pie pan. |
| 2. | In a bowl, toss apples with lemon juice. Combine sugar, flour, cinnamon, salt and nutmeg; add to apples and toss. Pour into crust; dot with butter. Roll out remaining pastry to fit top of pie; cut slits in top. Place over filling; seal and flute edges. Beat egg yolk and water; brush over pastry. Bake at 425 degrees F for 15 minutes. Reduce heat to 350 degrees F; bake 40-45 minutes more or until crust is golden and filling is bubbly. |
Saturday, August 22, 2009
cookie time!
Herrooo!!
right now i'm watching "Hoarders" on A&E and its amazing. I'm afraid i'm going to be like these ppl someday! i hope not.
anyways so today i made these cookies. the recipe is really really easy. I'll take pictures in a little bit. and yes. they are really delicious :D Happy!
update:
 Prep Time: 30 min
Inactive Prep Time:1 hr 0 min
Cook Time:12 min
Serves:25 to 30 cookies
Ingredients
Cookies:
- 6 tablespoons soft unsalted butter
- 1/2 cup sugar
- 1 large egg
- 1/2 teaspoon pure vanilla extract
- 1 1/2 cups all-purpose flour
- 1/2 teaspoon baking powder
- 1/2 teaspoon salt
Icing:
- 2 to 3 tablespoons just-boiled water
- 1 cup confectioners' sugar, sifted
- Food coloring, preferably pastes
- Special equipment: cookie cutters
Directions
Preheat the oven to 350 degrees F.
Cream the butter and sugar together until pale and moving towards moussiness, then beat in the egg and vanilla. In another bowl, combine the flour, baking powder, and salt. Add the dry ingredients to the butter and eggs, and mix gently but surely. If you think the finished mixture is too sticky to be rolled out, add more flour, but do so sparingly as too much will make the dough tough. Form into a fat disk, wrap in plastic wrap, and let rest in the refrigerator for at least 1 hour.
Sprinkle a suitable surface with flour, place disk of dough on it, and sprinkle a little more flour on top of that. Then roll it out to a thickness of about 1/4-inch. Cut into shapes, dipping the cutter into flour as you go, and place the cookies a little apart on 2 parchment or silpat lined baking sheets.
Bake for 8 to 12 minutes; obviously it depends on the shape you're using and whether they are on the upper or lower shelf, though you can swap them around after about 5 minutes. When they're ready expect them to be tinged a pronounced gold around the edges; they'll be softish still in the middle, but set while they cool.
Remove the cookies with a flat, preferably flexible, spatula to a wire rack. When they are fully cooled, you can get on with the icing. Put a couple of tablespoons of not-quite-boiling water into a large bowl, add the sieved confectioners sugar and mix together, adding more water as you need to form a thick paste. Color,as desired. I think pastes are much better than liquid, not just because the range of colors is better but because they don't dilute the icing as they tint. Ice cooled cookies, as desired.
Sunday, August 16, 2009
i wanna make steamed egg custard!
I really want steamed egg custard.. everytime i do it i seem to fail!
the recipe i have in my book has milk, but since i dont drink milk i have none and since its 10.20 at night i cant be bothered to run out and do it.
however, i dont ever recall my aunt using milk in the recipe.. so i did some research and most ppl dont use any milk at all! So i think i will try 2 cups of water and 1 egg and see how that goes.
heres recipe i'm going to try:
ingredients:
1 cup of beaten egg (will update when i know how many eggs that is) 4 eggs
2 cups of water
4oz of rock sugar (100g) not sure how many crystals this will be, but i think i wil just guess lol.
instructions:
- dissolve rock sugar in hot water. Make sure water is fully cooled before adding it into egg.
- online sources suggest lightly beating the eggs to make sure we dont overbeat or add too many bubbles into mixture.
- strain mixture through a wire strainer before pouring into container to strain out any unbeaten whites or bubbles :D
- mixture should make 4 bowls. Steam over gentle heat for 15-20 minutes. I read online that after putting the bowls into the steamer, you should stir the mixture for about 1 minute, and then let it steam for 15-20 mins. Since i'm not using a bamboo steamer, this is be faster, but those who are using bamboo, its recommended to steam longer.
apparently since i'm steaming with a metal steamer i should wrap the bowls with glad wrap to avoid watervapor. i think i will give that a try.
Alrightly. 1030 pm going to try making some custard! yummmm wish me good luck.
update: 10.50
ok i realised after doing all the prep i should have dissolved 1cup of water with the sugar first and then poured in another cup of water to make it cool down faster. lol well we'll see how long it takes for the mixture to cool down.. dont want any scrambled eggs! so i measured how many eggs would be in 1 cup and i used large brown eggs and 4 eggs is about 1 cup. But this probably varies, so you should still just break the eggs into the measuring cup and see how many eggs it will be. Since dont wanna wash any extra stuff, i'm going to use my rice cooker. but since my rice cooker cant fit multiple bowls at once, i'm going to use a big glass bowl and see how that goes. lol.
update: 12.18
no bubbles! perfect! the texture is a little soft in the middle.. maybe next time i wil let it cook longer since the container was bigger.. but it tastes delicious! a little too hot ahhaha cos i was too quick to try! ahhah i think when it cools down it wont be so sooo soft.
ps! i didnt bother with the stirring over the hot water thing because it was in the rice cooker.. but it came out fine :D maybe it owuld have cooked faster if i did that
maybe next time i will try making the salty kind with shrimp and scallions! ahhaha but this is very very soft.. i think if i do the salty kind it will be less water..


ahhaha the missing bit in the bowl is me trying it. Its a little sweet cos i put a really big piece of rock sugar in since i didnt know how to judge portions! hahahha it will be REALLY sweet when its cold but its ok! the point is i got the texture right! :D happy :D
Thursday, August 13, 2009
pear-mint thought experiment
David: what are your thoughts on pear-mint icing?
Phyllis: hmmm
Phyllis: i dont know
Phyllis: pear and mint is a great combo
Phyllis: but icing is a little heavy
Phyllis: i think maybe a pear mint glaze would be better than icing
David: what about a pear-mint meringue
Phyllis: hmm
Phyllis: is this for a cake
Phyllis: or just on its own
David: I was inspired a few minutes ago
David: it's more of a thought experiment
Phyllis: ok
Phyllis: well
Phyllis: hmm
Phyllis: i think part of whats really delicious about a cooked pear with syrup and mint is becuase its so light and cool for the summer
Phyllis: so the weight or texture of a meringe or icing just seems so heavy to me
Phyllis: because the freshness in the pear would be so important
Phyllis: but a meringue could be good
Phyllis: i think as a sorbet it would be heaven
David: oooh yes
David: a sorbet
David: good call
Phyllis: it would also be a really great summer dessert
Phyllis: poach pear with mint vanilla ice cream
David: perhaps with a light date/fig sauce sprinkled around?
Phyllis: oh yeaaaaaaaa
Wednesday, August 12, 2009


Saturday, August 8, 2009
wayyyyy too much chocolate cake.
ahhh
the title is self explanatory.. i made WAY to much chocolate cake. in typical me + failing to bake a cake fashion.. i misread one very important ingredient.. i thought there were 2 cups of coffee instead of 1! to fix the problem colin ran out to buy me more sugar and more flour.. so i ended up with double the amount of cake!
on top of that.. i made a butter cream frosting thats a little.. well.. too much.. so i'm hesistant to put the frosting on the cake.. i want to run out and get some heavy cream to make a ganache glaze instead but my mom really doesnt want me to do it..
anyways heres a retarded picture for you guys to take a look.

update. it might not be very pretty. but it taste pretty good. still think this cake shoudl have a ganache glaze though..
the title is self explanatory.. i made WAY to much chocolate cake. in typical me + failing to bake a cake fashion.. i misread one very important ingredient.. i thought there were 2 cups of coffee instead of 1! to fix the problem colin ran out to buy me more sugar and more flour.. so i ended up with double the amount of cake!
on top of that.. i made a butter cream frosting thats a little.. well.. too much.. so i'm hesistant to put the frosting on the cake.. i want to run out and get some heavy cream to make a ganache glaze instead but my mom really doesnt want me to do it..
anyways heres a retarded picture for you guys to take a look.


update. it might not be very pretty. but it taste pretty good. still think this cake shoudl have a ganache glaze though..
omg i'm starving!
i really want some chocolate cake! ahhaha
yesterday i watched julie and julia and loved it. hilarious :D but hahah i couldnt help but feel like maybe i'm copying julie powel ahahha but i'm sure there are so many ppl out there that do the same thing. plus i didnt actually know about julie powel when i started this blog so.. i guess its ok.
i think i'm going to attempt this recipe today, i got it from the food network website.. its called beatty's chocolate cake from the barefoot contessa.. i mean.. well i've never read julia child but i <3 ina garten from her perfect hamptoms cottage to her perfectly coiffed bob ;P
there is something i REALLY wanna try from the movie thats a famous julia child recipe.. the duck!!!! ahhaha it looks amazing! maybe someday alvin and i will attempt that! ahha
alvin is out of town this weekend camping so he cant do the challenge so its all me! wish me good luck :D
Ingredients
- Butter, for greasing the pans
- 1 3/4 cups all-purpose flour, plus more for pans
- 2 cups sugar
- 3/4 cups good cocoa powder
- 2 teaspoons baking soda
- 1 teaspoon baking powder
- 1 teaspoon kosher salt
- 1 cup buttermilk, shaken
- 1/2 cup vegetable oil
- 2 extra-large eggs, at room temperature
- 1 teaspoon pure vanilla extract
- 1 cup freshly brewed hot coffee
Directions
Chocolate Buttercream, recipe follows
Preheat the oven to 350 degrees F. Butter 2 (8-inch) round cake pans. Line with parchment paper, then butter and flour the pans.
Sift the flour, sugar, cocoa, baking soda, baking powder, and salt into the bowl of an electric mixer fitted with a paddle attachment and mix on low speed until combined. In another bowl, combine the buttermilk, oil, eggs, and vanilla. With the mixer on low speed, slowly add the wet ingredients to the dry. With mixer still on low, add the coffee and stir just to combine, scraping the bottom of the bowl with a rubber spatula. Pour the batter into the prepared pans and bake for 35 to 40 minutes, until a cake tester comes out clean. Cool in the pans for 30 minutes, then turn them out onto a cooling rack and cool completely.
Place 1 layer, flat side up, on a flat plate or cake pedestal. With a knife or offset spatula, spread the top with frosting. Place the second layer on top, rounded side up, and spread the frosting evenly on the top and sides of the cake.
Chocolate Frosting:
6 ounces good semisweet chocolate (recommended: Callebaut)
1/2 pound (2 sticks) unsalted butter, at room temperature
1 extra-large egg yolk, at room temperature
1 teaspoon pure vanilla extract
1 1/4 cups sifted confectioners' sugar
1 tablespoon instant coffee powder
Chop the chocolate and place it in a heat-proof bowl set over a pan of simmering water. Stir until just melted and set aside until cooled to room temperature.
In the bowl of an electric mixer fitted with a paddle attachment, beat the butter on medium-high speed until light yellow and fluffy, about 3 minutes. Add the egg yolk and vanilla and continue beating for 3 minutes. Turn the mixer to low, gradually add the confectioners' sugar, then beat at medium speed, scraping down the bowl as necessary, until smooth and creamy. Dissolve the coffee powder in 2 teaspoons of the hottest tap water. On low speed, add the chocolate and coffee to the butter mixture and mix until blended. Don't whip! Spread immediately on the cooled cake.
Thursday, July 30, 2009
Scallions of Victory


The scent of sizzling spring onions and toasty golden brown flour - Thats the smell of victory!
Though the competition was tough, I lived up to my bacon master reputation and made a dish that was not only delicious, but sexy.
Dicing spring onions is a more difficult task than most imagine. Only a real master knows how far down to dice - no easy feat!
Next I added my secret ingredient to give flavor, sexiness and kick. No body knows what exactly is in this 'seasame chili oil' but its safe to say there's a healthy helping of magic.
Secret #2
The trick to tasty fluffy delicious pancakes is to have many many layers. Folded rolled and repeated 20 times there's enough layering here to impress even the warmest person in New York in December.
Needless to say, my judge couldn't stop eating so phil - bring it on!
Wednesday, July 29, 2009
scallion pancake pt 2
mom score:
taste - 4
appearance - 3
creativity - 2
authenticity - 3
likeliness to be a good left over - 4
comment:
wished it had more salt in onion
taste - 3.5
appearance - 3.5
creativity - 2
authenticity - 3.25
likeliness to be a good left over- 4.5
comment: would like stronger onion flavor, and maybe a sauce.
scoring
all scores will be out of 5. and we will be judged on
taste
appearance
creativity
authenticity
likeliness to be a good left over?
hmm maybe we will come up with more things to score
taste
appearance
creativity
authenticity
likeliness to be a good left over?
hmm maybe we will come up with more things to score
scallion pancake pt 1

Oh dear! I missed a step!
the whole time i was making it i was thinking.. hmmm i feel like i'm doing something wrong?! then i noticed all the spring onions were on the outside??!!! then i was frying it and i thought.. how come it seems like the middle is so doughy??
then i looked at the recipe again and i realised instead of just rolling it like a taco and then rolling it into a swirly, (like a cinnamon roll) you have to roll it before you roll it! HAHHAHAHAH
oh my lordd!!!! well the first three i didnt realise the problem but the second three to salvage my problem i actually pulled the pancakes a little (kind of like those pizza guys stretching out the dough) so i believe i've put a lot more space into the pancake which might help diffuse the doughiness! ahhhhh well def put a little oil while your putting in the scallions and the salt becuase thats going to make your pancake a lot flakier.

Alvin! i hope you read this before you attempt this! ahhahahahha
Good luck :D
Will post with scores ahhahah
scallion pancakes.
OK! i found the recipe. when are we going to do this?
Ingredients
Pancakes
3 stalks of scallions, chopped
1 1/4 cups white all-purpose flour
1/2 cup of cold water
salt
sesame oil (optional)
additional flour and water as required
Dipping Sauce
sesame oil
sodium-reduced light soy sauce
minced garlic
This recipe makes four to five scallion pancakes, depending on the thickness
Instructions
To make the dipping sauce:
Mix equal parts soy sauce and sesame oil. (If you do not use sodium-reduced soy sauce, you might want to use less than one part.)
Add the minced garlic. Let the sauce sit while you prepare the pancakes.
To make the pancakes:
Combine the water and the flour in a bowl, and mix until smooth. If necessary, add more flour or more water. The dough should not be wet, nor should it be too dry and hard.
Divide the dough into four or five equal parts. (Four parts makes 6-inch pancakes that are the thickness of thick crepes; five parts makes 6-inch pancakes that are about as thin as tortillas).
Place one piece of dough on a floured surface and keep the remaining portions covered.
Roll out the dough into a three- or four-inch circle, flouring the rolling pin as needed.
Sprinkle a little salt and two or three teaspoons of scallions on top of the pancake. You may also brush it lightly with sesame oil before adding the scallions (Fig. 2).
Roll up the pancake (Fig. 3).
Take one end of the rolled up pancake and roll it along its length. Then, place it on its side (Fig. 4).
Flatten the rolled-up pancake slightly with your hand, and then roll it out with the rolling pin, to about 6 inches.
Very lightly flour both sides of the pancake, place it on a plate, and cover with an inverted plate.
Roll out the other pancakes, following steps 3 to 8. The pancakes should look like Fig. 5. Don't worry if they're not perfectly round.
Heat a bit of canola oil over medium-high heat.
Brush off any excess flour, and then fry the first pancake until both sides have golden-brown spots.
Cook the remaining pancakes. When needed, add more oil to the pan. You may notice, during cooking, that some parts of the pancakes puff up. This is normal.
Cut the pancakes into quarters and serve with dipping sauce.
Tips
Sprinkle a little more salt over the pancakes just before serving.
Substitute a bit of the scallions with chopped cilantro.
Add sesame seeds to the dough before rolling.
Some recipes use butter. I don't recommend it, as it is not authentic.
Use any dipping sauce you want. Hot sauce is good.
Pancakes should be eaten right away. If they sit too long, they become limp and soggy.
Eat the wedges with chopsticks or your hands. :)
(copied from http://hubpages.com/hub/How-to-Make-Scallion-Pancakes)
Tuesday, July 28, 2009

Sunday, July 26, 2009
Welcome a New Challenger!
 Hey Everybody! My name is Alvin and starting this week I'll be challenging Phyllis to one on one cooking challenges to the death!
 As a credited master of bacon and the MacGyver of ingredients, Phyllis better watch out because I'm bringing my superior cooking from my imagination to the kitchen!
Monday, January 26, 2009
catchup?
Hello! Well, i havent blogged for a week and a half because i was trying to get photos of the food from colin to upload! But we never got around to it. so lemme try and remember what i've been eating since.. last last wednesday....... lets see..
thursday.. i cant remember what i ate on that day.. i'l ask colin when he gets up
friday.. oh i didnt eat anything for dinner on friday because i was supposed to go out and then i didnt so all i ate was vegetable buns. ahhahahha
saturday OH yes!
for brunch Colin, Jesse and I went to the wonderful Bagel World on dekalb in fort green. Anyone looking for really good bagels in fort green/clinton hill should definately give this place a visit (i'm pretty sure everyone who lives in fort green knows about the wonder that is bagel world) Their everything bagel is my absolute favorite, and goes great with lox. ahahha :D i'll check the price next time and update ahahhaha.
lets see... then.. oh yes. in the afternoon i stopped by dean and deluca (we were in soho shopping) and i picked up a Siggi Skyr Icelandic Yogurt. Must be pretty popular seeing how the only flavor left was orange and ginger. This yogurt is SUPER thick and SUPER creamy, but toally delicious and even though i can only eat so much dairy, i loved it.
for dinner we ordered Mexican and our favorite Mexican place on wilson ave and hart st. Super delicious and really affordable. I usually a chicken and steak taco (1.99 per taco), and sometime a chicken tostada. a direct quote from my friend david on his favourite thing to order "burritos are the best, because they give you a gigantic pile of the burrito stuff on the pita, so you have to eat down the mound before you can actually make a rolled up burrito out of it. it's brilliant." (burritoes are 4.99)
i think at midnight we also went to grand morelos on grand and metropolitan and got more mexican food. ahhahaha Colin and i love ordering the Chicken torta here. But actually.. since theyve changed the decor and what not.. something about this place just doesnt seem the same...
sunday.
oh yes. Colin and i woke up late, so we made fried chicken wings ahhaah (i know thats a really odd thing to eat first thing in the morning, but still). well i did a little experiementing, and ended up with two kinds of chicken wings
needs: flour, seasoning eg. chilli powder, roast chicken seasoning, salt, pepper, flavored bread crumbs, two eggs, 8 wings, 1 big zip lock bag. and a pot with oil. ahha STOP HERE if you want thin batter wings, but if you want thick batter you also want 1/2 to 1 cup of milk
- so i started off by putting all the wings into a big pot and soaking it in some really really hot water (i'm a little ocd and i think its good to wash off the dirt or whatever.. also i find that doing this helps get rid of some of the oil from the skin).
- then i threw in all the dry ingredients into the zip lock bag.
- beat eggs, roll chicken wings in eggs
- put chicken wings into bag and toss so the flour etc covers the wings.
- when oil is ready (you can throw a little piece of bread crumb in.. you'll know the oil is hot when th bread crumb bubbles quickly and floats) then put your wings in! I find that because of the shape of the wings, your better off putting the wings with the outside facing down first. Make sure you have enough oil (there should be enough oil to cover the up to the middle of the wing.. but dont worry about the tip.. it'll cook when you flip the wing over)(usually i try not to use too much oil in my food but you cant really do much about it when your deep frying chicken wings lol). let the wings sit in there for a while until golden then flip over. take out the wings when they are golden brown.
so if you want you wings to have a thicker batter, pour some milk into the bag of dry ingredients (with the eggs and the wings in it) and make it til the wings are thoroughly covered. then repeat the last step.
oh wow. this is really a giagantic post. maybe i will stop now and continue into another post. ahahhaha
Friday, January 16, 2009
special!
Hello!
Yesterday was me and my boyfriend's 3 year anniversary dinner. So, we decided to get seafood and make a nice salad. We had recently heard about lobster being on sale (even though it was more expensive than what i expected it to be - 9.55 per lb but thats cheaper than the $15 per lb before right?). so we got two 1 lbers, steamed and ate it with butter + a really good salad. The lobster was pretty simple, just steaming it in water and eating it with butter. I made a arugala and apple salad, with golden raisins, blue cheese, pine nuts, and yellow onions (i would have prefered red, but i forgot to get them and by the time we ran out to go get onions it was too late!). I think maybe from now on i will keep track of how much i spend on each thing so i can figure out how much i'm spending on each dish! haha. Oh i also made a delicious apple cider vinegarette - i mixed apple cider vinegar (1 table spoon), olive oil (2 tsp) maple syrup (1/2 tsp), honey (2 tsp), whole grain dijon mustard (2 tsp), salt, ground pepper. whisk. I think you should season the dressing depending on how salty the cheese is, because i happened to pick a pretty salty blue cheese, and so i found the salad a little be salt for my taste, but my boyfriend (who likes things a little more salty than i) really enjoyed this recipe. Try it out! This dressing is super good for those fall fruits, like bartlett pears and apples. :D yum! I suspect the salad would have been even better if i had toasted the pine nuts! ahhh.. next time. I took pictures but my boyfriends camera was running out of battery so the pics mght be bad! Next time!
2 1lb lobsters - steamed over water with dash a salt for 12 mins
apple, arugala and pine nut salad - with blue cheese, golden raisins, onions (cheese could probably be replaced with a goat cheese if blue cheese is too strong)
apple cider vinegarette - apple cider vinegar (1 table spoon), olive oil (2 tsp) maple syrup (1/2 tsp), honey (2 tsp), whole grain dijon mustard (2 tsp), salt, ground pepper. <-- i like my dressings a little sweeter, so i was probably pretty generous with the honey, but it all depends. I suspect a dash a lemon juice would have made this pretty yum too!
blog soon :D
Tuesday, January 13, 2009
the empty pit
"good morning starshine! the earth says hello!"
Hello! Do you live alone? Or kind of alone because you come home everyday, and you look in your fridge and you dont know what to eat? Do you fantasize about cooking delicious meals only to realise that you'll be eating the same meal for days later because you have no one to share it with? Or are you too broke to go out for dinner everyday, or dont want to be seen eating alone? I have a roommate and a boyfriend, and great friends that I can usually rely on to share a meal with, at home or outside. Well, at least, I used to. Lately I've been pretty broke, and so are my friends, so we havent been going out for dinner much. That and I havent really been feeling as generous as I used to just cause it's too expensive to throw a dinner party nowadays!
Well, I'm pretty bummed out about it, so I've decided to start this blog. Here I'm going to share with you my attempts to create fun enjoyable meals for one (maybe sometimes two lol), and share grocery tips on what to get each week, and how to avoid eating the same meals for days in a row (I've definitely experienced a lot of that lately). I invite you to share with me your ideas and suggestions, so we can all try this together, and eat well and happy for our stomachs and our wallets!
hope you visit again soon! :D
Subscribe to:
Comments (Atom)